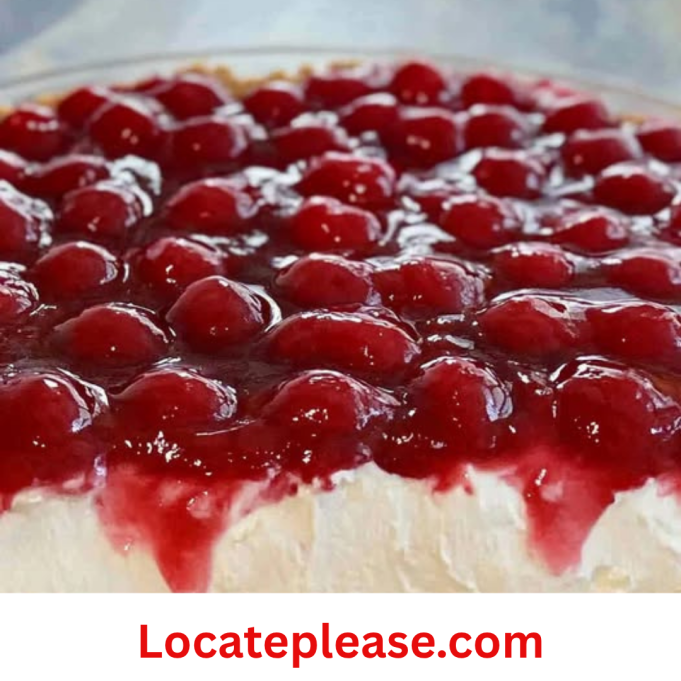
Silky, cloud-like cheesecake filling layered over a buttery graham cracker crust and topped with sweet cherry pie filling—this no-bake dessert is pure comfort in every bite. With zero oven time, just 15 minutes of prep, and make-ahead ease, it’s the ultimate crowd-pleasing treat for holidays, potlucks, or whenever you need something cool, creamy, and irresistibly delicious.
Why You’ll Love This Recipe
This isn’t just another dessert—it’s effortless elegance. Inspired by classic American cheesecakes and retro fridge pies, this version skips the baking, avoids cracks, and delivers big flavor with minimal effort. The light whipped topping keeps it fluffy, while the cherry glaze adds a vibrant pop of color and tangy sweetness.
Perfect for:
- Summer gatherings and holiday dinners
- Last-minute guests or busy weeknights
- Make-ahead meals (it tastes even better the next day!)
- Fans of cherry pie, banana splits, or icebox cakes
Ingredients
For the Buttery Crust
- 2 cups (200g) graham cracker crumbs (about 14 full sheets)
- ½ cup (1 stick / 115g) unsalted butter, melted
- 2 tbsp (25g) granulated sugar
For the Fluffy Cheesecake Filling
- 2 packages (8 oz / 225g each) cream cheese, softened to room temperature
- 1 cup (120g) powdered sugar, sifted
- 1 tsp pure vanilla extract
- 1 tub (8 oz / 225g) whipped topping (like Cool Whip), thawed
For the Cherry Topping
- 1 (21 oz / 600g) can cherry pie filling (homemade optional)
Optional Garnishes
- Extra dollops of whipped cream
- Fresh cherries or mint leaves
- Sprinkle of cinnamon or chocolate shavings
Step-by-Step Instructions
1. Make the Crust
In a bowl:
- Mix graham cracker crumbs, melted butter, and sugar until evenly moistened.
- Press firmly into the bottom of a 9×13-inch baking dish using the back of a spoon or flat glass.
- Chill in the refrigerator while making the filling (~10 mins).
2. Prepare the Cheesecake Filling
In a large bowl:
- Beat softened cream cheese with an electric mixer on medium speed until smooth (~1 minute).
- Add powdered sugar and vanilla extract. Beat until fully blended and creamy.
- Gently fold in thawed whipped topping with a spatula until light, fluffy, and no streaks remain.
3. Assemble the Layers
- Spread the cheesecake mixture evenly over the chilled crust.
- Carefully spoon cherry pie filling over the top, spreading gently to cover completely.
4. Chill Until Set
- Cover with plastic wrap and refrigerate at least 4 hours, or overnight for best results.
- The longer it chills, the firmer and more sliceable it becomes.
5. Serve Cold & Creamy
- Cut into squares with a sharp knife dipped in hot water for clean edges.
- Serve well-chilled.
Enjoy as:
- A standalone dessert
- With extra whipped cream or vanilla ice cream
- Alongside coffee, tea, or sparkling cider
You Must Know
- Use softened cream cheese —cold blocks create lumps. Let sit out 30–60 mins before using.
- Thaw whipped topping overnight —don’t rush it in the microwave.
- Chill thoroughly —warm slices may fall apart.
- Tastes better the next day! Flavors deepen and texture firms up.
- Freezer-friendly? Best fresh—but freeze unfrosted layers up to 3 months.
Storage Tips
- Store covered in the refrigerator for up to 5 days.
- Do not freeze once assembled—the whipped topping may separate upon thawing.
- Freeze crust and filling separately if desired; assemble and add topping when ready.
Ingredient Substitutions
|
Graham crackers
|
Digestive biscuits, Oreos (filling removed), or gluten-free cookies
|
Flavor variations
|
|
Whipped topping
|
Homemade whipped cream
|
More natural, less sweet
|
|
Cherry pie filling
|
Blueberry, apple, or peach pie filling
|
Seasonal swaps
|
|
Cream cheese
|
Mascarpone or dairy-free alternative
|
Richness substitute
|
|
Butter
|
Ghee or plant-based butter
|
Slight flavor change
|
Serving Suggestions
- Serve family-style on a cake stand with candles.
- Great for potlucks—bring the whole pan!
- Double the batch and freeze half for future celebrations.
- Pair with fruit salad or lemon bars.
Cultural Context
Rooted in American mid-century convenience cooking and vintage Jell-O mold traditions, this recipe celebrates how simple ingredients—crackers, cream cheese, and canned fruit—can become something deeply satisfying. Found at church suppers, school fundraisers, and creative kitchens alike, it honors the joy of sharing handmade sweetness.
Pro Tips
- Double the recipe? Yes—perfect for feeding a crowd.
- Want more tartness? Add a splash of lemon juice to the filling.
- Make ahead: Assemble 1–2 days ahead. Chill until serving.
- Label your dish: People will ask for the recipe.
- Say “ready?” before serving —it’s part of the ritual.
Frequently Asked Questions
Q: Can I use homemade cherry filling?
A: Absolutely! Cook 2 cups pitted cherries with ¼ cup sugar, 1 tbsp cornstarch, and 1 tsp lemon juice until thickened.
Q: Why did my filling turn out lumpy?
A: Likely cold cream cheese. Always soften to room temperature before mixing.
Q: Is this gluten-free?
A: Only if using GF graham crackers and verifying all ingredients.
Q: Can I make individual servings?
A: Yes! Layer in parfait glasses or mason jars for cute mini desserts.
Q: Can I air fry leftovers?
A: No—but reheat briefly in microwave (5 secs) to soften center.
Allergy Information
Contains: dairy (butter, cream cheese, whipped topping), wheat (in graham crackers).
Gluten-free option: Use certified GF cookies.
Nut-free: This recipe is naturally nut-free.
Always check labels—especially on processed toppings and pie fillings.
Nutrition Facts (Per Serving – Approximate)
Based on 12 servings
- Calories: 280
- Fat: 16g
- Saturated Fat: 9g
- Carbohydrates: 30g
- Fiber: 1g
- Sugar: 20g
- Protein: 4g
- Sodium: 380mg
This dessert doesn’t shout. It emerges cold from the fridge, creamy and inviting, saying everything a great treat should: “Slice me slow. Share me. This is good.” That’s how the best ones begin—not with silence, but with cherry, care, and someone who says, “Let’s make it together.”


