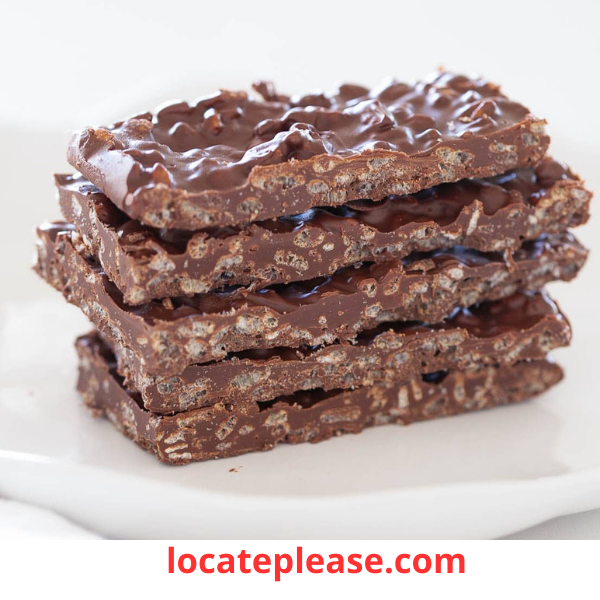
These Chocolate Crunch Bars are a simple yet decadent homemade treat that combines creamy chocolate, crunchy cereal, and rich nut butter for an irresistible texture and flavor. Perfect for satisfying your sweet tooth or gifting to friends and family, this no-bake recipe is quick to prepare and endlessly customizable. With just three main ingredients, you can create a delicious candy bar that rivals any store-bought version.
Ingredients
(Makes 12–16 bars, depending on size)
- 2 cups semi-sweet chocolate chips (high-quality baking chips recommended, such as Guittard or Ghirardelli)
- 3 cups Rice Krispies cereal (original or gluten-free, if needed)
- 1 cup smooth peanut butter (or substitute with crunchy peanut butter, almond butter, cashew butter, etc.)
Optional Add-ins:
- A pinch of sea salt for topping
- Chopped nuts (peanuts, almonds, or cashews) for extra crunch
- Drizzle of white chocolate or melted peanut butter for decoration
Instructions
- Prepare the Pan
- Line an 8×8-inch square baking pan with parchment paper, leaving some overhang on the sides for easy removal. Lightly grease the parchment paper with nonstick cooking spray or a tiny bit of oil.
- Melt the Chocolate
- In a microwave-safe bowl, melt the chocolate chips in 30-second intervals, stirring between each interval until fully smooth and glossy. Alternatively, use a double boiler on the stovetop to gently melt the chocolate.
- Set aside about ½ cup of melted chocolate to drizzle on top later.
- Mix the Ingredients
- In a large mixing bowl, combine the Rice Krispies cereal and peanut butter. Stir well to evenly coat the cereal with the peanut butter.
- Pour the remaining melted chocolate into the bowl with the cereal mixture. Gently fold everything together until the cereal is completely coated in chocolate and peanut butter. Be careful not to crush the cereal too much.
- Press Into the Pan
- Transfer the mixture to the prepared baking pan. Use a spatula or the back of a spoon to press it down firmly and evenly into the pan. The firmer you press, the better the bars will hold together.
- Drizzle and Decorate
- Drizzle the reserved melted chocolate over the top of the bars using a fork or piping bag. If desired, sprinkle with sea salt, chopped nuts, or other toppings while the chocolate is still wet.
- Chill Until Firm
- Place the pan in the refrigerator for at least 1–2 hours, or until the chocolate has hardened completely.
- Cut Into Bars
- Once firm, lift the bars out of the pan using the parchment paper overhang. Cut into squares or rectangles of your desired size.
- Store and Serve
- Store the Chocolate Crunch Bars in an airtight container in the refrigerator for up to 1 week. For best results, separate layers with parchment paper to prevent sticking.
Tips for Success
- Customize Your Bars: Swap peanut butter for almond butter, cashew butter, or sunflower seed butter to suit your taste preferences or dietary needs.
- Add Texture: Mix in mini marshmallows, crushed pretzels, or dried fruit for a fun twist.
- Double the Chocolate: For extra indulgence, dip the cut bars in additional melted chocolate before chilling.
- Make It Dairy-Free: Use dairy-free chocolate chips and nut butter to create a vegan-friendly version.
Why You’ll Love This Recipe
These Chocolate Crunch Bars are a perfect blend of textures—crunchy, creamy, and chocolatey—all in one bite. They’re easy to make, require minimal ingredients, and offer endless possibilities for customization. Whether you’re looking for a quick dessert or a thoughtful homemade gift, these bars are sure to delight everyone who tries them!
Enjoy your homemade Chocolate Crunch Bars!


