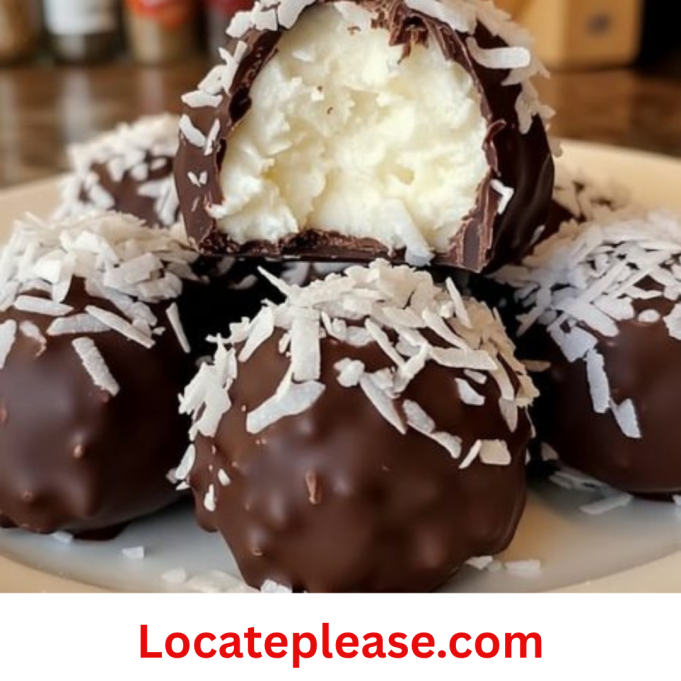
Rich, creamy coconut truffles dipped in silky chocolate and kissed with a hint of vanilla—these no-bake delights are like magic in your hands. With a soft, sweet coconut center, a glossy chocolate shell, and a sprinkle of shredded coconut for texture, they’re perfect for holidays, gift-giving, or satisfying a sweet tooth the whole family will love.
Why You’ll Love This Recipe
This isn’t just another dessert ball—it’s holiday magic on a spoon. Inspired by classic coconut clusters and European truffles, these little gems come together in minutes with just a few ingredients. No baking, no fuss—just creamy, chewy, chocolate-dipped bliss that tastes like vacation in every bite.
Perfect for:
- Holiday cookie trays and Christmas treats
- Last-minute gifts and party favors
- Make-ahead desserts (they freeze beautifully!)
- Fans of Mounds bars, Almond Joys, or tropical flavors
Ingredients
For the Coconut Filling
- 2 cups (150g) sweetened shredded coconut (not unsweetened)
- ½ cup (120ml) sweetened condensed milk (key for binding and sweetness)
- ¼ cup (½ stick / 56g) unsalted butter, softened to room temperature
- ½ tsp pure vanilla extract
- Pinch of salt
For the Chocolate Coating
- 8 oz (225g) semi-sweet chocolate, finely chopped (or chocolate chips)
- 1 tbsp (14g) coconut oil (helps chocolate set smoothly and shine)
For Garnish & Texture
- Extra shredded coconut (for rolling or sprinkling)
Step-by-Step Instructions
1. Make the Coconut Filling
In a medium bowl:
- Combine shredded coconut, condensed milk, softened butter, vanilla, and salt.
- Stir until fully blended into a thick, sticky dough that holds together when pressed.
2. Shape the Balls
- Scoop teaspoon-sized portions (~1 tbsp each).
- Roll gently between your palms into smooth, uniform balls (~1-inch diameter).
- Place on a parchment-lined baking sheet or tray.
Yields 20–24 balls, depending on size.
3. Chill to Firm Up
- Refrigerate the balls at least 30 minutes (up to 2 hours).
- This firms them up so they won’t fall apart when dipped.
4. Melt the Chocolate
In a microwave-safe bowl:
- Combine chopped chocolate and coconut oil.
- Microwave in 20–30 second bursts, stirring between each, until completely melted and smooth (~1–2 mins total).
5. Dip in Chocolate
Using a fork or toothpick:
- Pick up one chilled ball and dip it into the melted chocolate, turning to coat completely.
- Let excess drip off back into the bowl.
- Return to the parchment paper.
6. Garnish (Optional but Recommended!)
While chocolate is still wet:
- Sprinkle or roll in extra shredded coconut for texture and visual flair.
7. Set the Chocolate
- Let sit at room temperature 10–15 mins, or refrigerate 15–20 minutes until chocolate is fully hardened.
8. Serve & Share
- Transfer to an airtight container and store in the fridge.
- Serve cold straight from the fridge for best texture.
Enjoy as:
- A holiday treat with coffee or tea
- A festive gift in mini boxes or cellophane bags
- A sweet surprise in lunchboxes (add ice pack if needed)
You Must Know
- Use sweetened coconut —unsweetened won’t bind well or taste right.
- Chill before dipping —warm centers melt the chocolate.
- Coconut oil is key —it helps chocolate harden and gives a professional finish.
- Tastes better the next day! Flavors deepen overnight.
- Freezer-friendly —wrap tightly and freeze up to 3 months.
Storage Tips
- Store in the fridge for up to 2 weeks in an airtight container.
- Freeze for up to 3 months —thaw in fridge before serving.
- Layer with parchment to prevent sticking.
Ingredient Substitutions
|
Sweetened coconut
|
Homemade toasted coconut flakes
|
For fresher taste
|
|
Condensed milk
|
Coconut condensed milk (vegan)
|
Plant-based option
|
|
Butter
|
Ghee or plant-based butter
|
Slight flavor change
|
|
Semi-sweet chocolate
|
Dark, milk, or white chocolate
|
For different sweetness
|
|
Coconut oil
|
Neutral oil (like avocado)
|
Less coconut flavor
|
Serving Suggestions
- Arrange on a tiered tray with other holiday treats.
- Great for cookie swaps—label with “No-Bake Magic!”
- Double the batch and freeze half for future joy.
- Pair with hot cocoa or eggnog.
Cultural Context
Rooted in tropical island traditions and vintage American confectionery, this recipe celebrates how two simple ingredients—coconut and chocolate—can become something deeply satisfying. Found at Christmas tables, beachside markets, and creative kitchens alike, it honors the joy of sharing handmade sweetness.
Pro Tips
- Double the recipe? Yes—perfect for gifting.
- Want more crunch? Add chopped almonds or pecans to the filling.
- Make ahead: Assemble balls 1–2 days ahead. Dip day-of for best shine.
- Label your dish: People will ask for the recipe.
- Say “ready?” before serving —it’s part of the ritual.
Frequently Asked Questions
Q: Can I use coconut flakes instead of shredded?
A: Yes—but chop them slightly for easier rolling.
Q: Why did my chocolate crack?
A: Likely due to temperature shock. Let balls warm slightly before dipping.
Q: Is this gluten-free?
A: Yes—if using GF-certified chocolate and verifying all ingredients.
Q: Can I make them vegan?
A: Absolutely! Use dairy-free chocolate, plant-based butter, and vegan condensed milk.
Q: Can I air fry them?
A: No—but reheat briefly in microwave (5 secs) to soften center.
Allergy Information
Contains: dairy (butter, chocolate), tree nuts (in some processed chocolates).
Gluten-free option: This recipe is naturally gluten-free.
Nut-free: Use nut-free chocolate and verify labels.
Always check labels—especially on processed chocolate and condensed milk.
Nutrition Facts (Per Ball – Approximate)
Based on 24 servings
- Calories: 120
- Fat: 9g
- Saturated Fat: 7g
- Carbohydrates: 10g
- Fiber: 1g
- Sugar: 8g
- Protein: 1g
- Sodium: 25mg
These balls don’t shout. They sit quietly in the fridge, cool and inviting, saying everything a great treat should: “Unwrap me. Eat me. This is good.” That’s how the best ones begin—not with silence, but with coconut, care, and someone who says, “Let’s make it together.”


