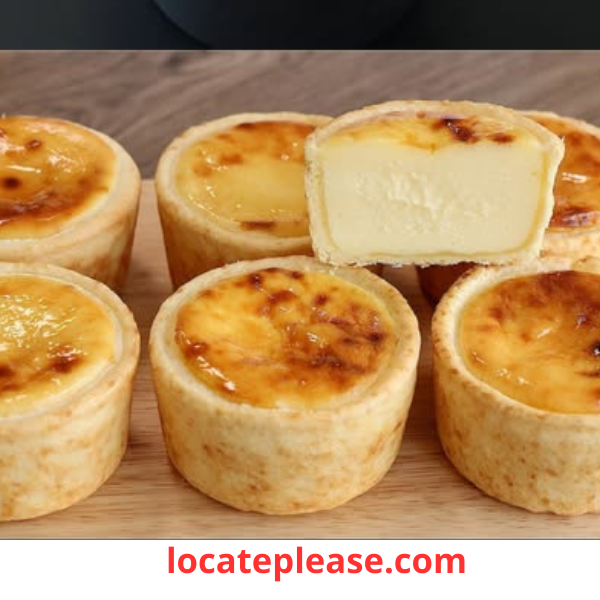
Indulge in the rich, creamy goodness of cheesecake in a buttery tart shell with this Cheesecake Tart Recipe . Perfect for parties or as a special treat, these tarts combine a crisp crust with a velvety cheesecake filling for an irresistible dessert.
Why You’ll Love This Recipe:
- Perfectly Balanced: The buttery tart shell complements the creamy cheesecake filling beautifully.
- Customizable: Top with fresh berries, caramel drizzle, chocolate ganache, or dust with powdered sugar for added flair.
- Make-Ahead Friendly: Prepare the tart shells and filling ahead of time for stress-free entertaining.
Ingredients
For the Tart Dough (Makes 12 Shells):
- 230 g cake flour 🌾
- 15 g granulated sugar 🫚
- 2.5 g salt 🧂
- 135 g unsalted butter , cold and cubed 🧈
- 50 g ice-cold water 💧
For the Cheesecake Filling:
- 400 g Philadelphia cream cheese , room temperature 🧀
- 20 g cornstarch
- 130 g granulated sugar 🫚
- 140 g egg (approximately 3 large eggs, beaten ) 🥚
- 8 g fresh lemon juice (about 1 tsp ) 🍋
- 6 g vanilla extract (about 1 tsp ) 🌿
- 215 g whipping cream , cold 🥄
Instructions
Step 1: Make the Tart Dough 🥄
- In a large mixing bowl, combine the cake flour , granulated sugar , and salt .
- Add the cold, cubed butter to the dry ingredients. Use a pastry cutter or your fingers to rub the butter into the flour mixture until it resembles coarse crumbs.
- Gradually add the ice-cold water , one tablespoon at a time, mixing gently with a fork until the dough comes together. Be careful not to overwork the dough.
- Form the dough into a flat disc, wrap it in plastic wrap, and refrigerate for at least 30 minutes (or up to 2 days).
Step 2: Shape the Tart Shells 🥮
- Preheat your oven to 350°F (175°C) . Grease a 12-cup tart pan or line with parchment paper.
- On a lightly floured surface, roll out the chilled dough to about 1/8-inch thickness . Cut circles slightly larger than the tart molds using a cookie cutter or glass.
- Press the dough gently into each tart mold, trimming any excess. Prick the bottoms with a fork to prevent puffing during baking.
- Line each shell with parchment paper and fill with pie weights or dried beans. Blind bake for 10–12 minutes , then remove the weights and bake for another 5–7 minutes , or until golden brown. Let cool completely.
Step 3: Prepare the Cheesecake Filling 🧀
- In a large mixing bowl, beat the cream cheese until smooth and creamy.
- Add the cornstarch and granulated sugar , mixing until fully incorporated.
- Gradually add the beaten eggs , lemon juice , and vanilla extract , mixing on low speed to avoid incorporating too much air.
- Slowly pour in the cold whipping cream , mixing until the filling is smooth and homogeneous.
Step 4: Assemble and Bake 🔥
- Preheat your oven to 325°F (160°C) .
- Pour the cheesecake filling evenly into the cooled tart shells, filling each about ¾ full .
- Tap the tart pan gently on the counter to release any air bubbles.
- Bake for 20–25 minutes , or until the edges are set but the centers are still slightly jiggly.
- Turn off the oven and leave the tarts inside with the door slightly ajar for 10 minutes to prevent cracking.
Step 5: Cool and Serve 🍴
- Remove the tarts from the oven and let them cool to room temperature.
- Refrigerate for at least 4 hours , or overnight, to allow the filling to set completely.
- Top with your favorite garnishes—fresh berries, caramel sauce, chocolate drizzle, or a dusting of powdered sugar—and serve chilled.
Tips for Success:
- Add-Ins: Stir in mini chocolate chips, citrus zest, or finely chopped nuts into the filling for extra flavor.
- Storage: Store the tarts in an airtight container in the refrigerator for up to 3 days .
- Freeze Option: Freeze unbaked tart shells or fully assembled tarts for up to 3 months . Thaw overnight in the refrigerator before serving or baking.
Nutritional Information (per tart, makes 12):
- Calories: ~350 kcal
- Protein: ~6g
- Carbohydrates: ~30g
- Fat: ~25g
Enjoy these Cheesecake Tarts as a decadent dessert that’s both creamy and buttery. Their individual portions make them perfect for sharing, while their versatility allows you to customize them for any occasion. Whether topped with fresh fruit or a drizzle of chocolate, these tarts are sure to impress your guests—or satisfy your own sweet tooth!


