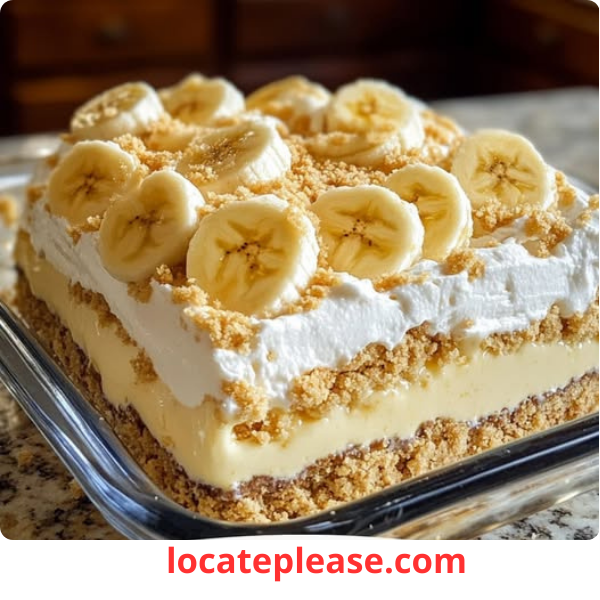
This Banana Pudding Lush is a creamy, dreamy dessert that layers the classic flavors of banana pudding with a rich cream cheese layer and silky instant pudding. Topped with fresh bananas and crunchy vanilla wafers—it’s like banana cream pie met a no-bake cake in the best way possible.
Perfect for potlucks, family gatherings, or anytime you need a sweet slice of Southern comfort!
Why You’ll Love This Recipe:
- 🍌 Banana Lovers’ Dream: Every layer bursts with sweet banana flavor.
- 🧈 Cream Cheese Magic: Adds richness and a smooth texture without being heavy.
- 🥣 No-Bake Layers: No boiling, no fuss—just mix, chill, and enjoy.
- 🍪 Crunch & Cream Balance: Vanilla wafer crust + soft pudding + whipped topping = pure bliss.
- ⏱️ Make Ahead Treat: Prep it the night before and bring straight from the fridge to the table.
Ingredients (Serves 12–15):
For the Crust:
- 1 box vanilla wafers , crushed (about 2½ cups crumbs)
- ½ cup melted butter
For the Cream Cheese Layer:
- 8 oz cream cheese , softened
- 1 cup powdered sugar
- 1 cup whipped topping (like Cool Whip), thawed
For the Banana Pudding Layer:
- 2 boxes (3.4 oz each) instant banana pudding mix
- 3 cups cold milk (dairy or plant-based)
For the Topping:
- Remaining whipped topping (about 2 cups)
- 2 ripe bananas , sliced
- Extra crushed vanilla wafers for garnish
Instructions:
Step 1: Make the Crust
Preheat oven to 350°F (175°C) .
In a bowl, mix:
- Crushed vanilla wafers
- Melted butter
Press evenly into the bottom of a 9×13-inch baking dish .
Bake for 8–10 minutes until lightly golden.
Let cool completely before adding the next layers.
Step 2: Prepare the Cream Cheese Layer
In a large mixing bowl, beat:
- Cream cheese until smooth
- Add powdered sugar and mix well
Fold in 1 cup whipped topping until fully combined.
Spread this mixture over the cooled crust.
Step 3: Whisk Up the Banana Pudding
In a separate bowl, whisk together:
- Banana pudding mixes
- Cold milk
for about 2 minutes , until thickened.
Pour this pudding layer directly over the cream cheese mixture.
Step 4: Chill Before Topping
Refrigerate for 15–20 minutes to set the pudding slightly.
This helps the final whipped topping layer stay neat on top.
Step 5: Top It Off
Once the pudding has chilled briefly, spread the remaining whipped topping over the top.
Smooth it out with a spatula for a clean finish.
Step 6: Finish with Bananas & Wafers
Right before serving, top with:
- Fresh banana slices
- Sprinkle of crushed vanilla wafers
This keeps the bananas from getting soggy if you want to make it ahead.
Step 7: Refrigerate and Serve Chilled
Cover and refrigerate the entire lush dessert for at least 4 hours , or overnight for best results.
Slice into squares and serve cold for maximum flavor and texture.
Tips for Success:
- 🥄 Use Cold Ingredients: For best texture, keep everything chilled before layering.
- 🥛 Dairy-Free Option: Use almond or coconut milk and vegan whipped topping.
- 🍌 Avoid Browning Bananas: Add banana slices right before serving or lightly brush with lemon juice if preparing early.
- ❄️ Freeze for Later: These freeze well—wrap tightly and thaw in the fridge before serving.
- 🧁 Garnish Ideas: Add mini banana chips, chocolate shavings, or caramel drizzle for extra flair.
Serving Suggestions:
- Serve at birthday parties, church potlucks, or holiday get-togethers.
- Pair with coffee, tea, or a tall glass of cold milk.
- Great alongside vanilla ice cream or Greek yogurt for a twist.
Nutritional Information (per serving, makes 12 servings):
(Approximate values – based on regular ingredients)
- Calories: ~250 kcal
- Protein: ~3g
- Carbohydrates: ~25g
- Fat: ~15g
- Fiber: ~0.5g
- Sugar: ~15g
This Banana Pudding Lush brings all the nostalgia of classic banana pudding with a few smart shortcuts and extra layers of creaminess. With its crunchy vanilla wafer base, soft banana filling, and fluffy whipped topping—it’s a dessert worth making again and again.
So go ahead and whip up a batch today… because once you taste it—you won’t be able to stop at one square!


