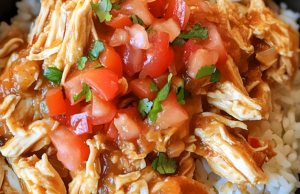
A healthier, oven-baked twist on the classic takeout favorite—this sticky, tangy-sweet chicken is crispy on the outside, tender on the inside, and smothered in a vibrant homemade sauce. With no deep frying required, it’s an easy one-pan meal that delivers bold flavor and comfort without the grease.
Why You’ll Love This Recipe
This isn’t just another chicken dish—it’s takeout magic made healthy. By baking instead of frying, you get all the crispiness and flavor of restaurant-style sweet and sour chicken with far less oil. The cornstarch coating crisps beautifully in the oven, while the glossy sauce—made from ketchup, apple cider vinegar, and sugar—sticks perfectly to every bite.
Perfect for:
- Weeknight dinners
- Meal prep (sauce only—add chicken later)
- Family-friendly meals
- Serving over rice or quinoa
Ingredients
For the Chicken
- 4 boneless, skinless chicken breasts (~1.5 lbs / 680g), cut into 1-inch pieces
- 1 cup (120g) cornstarch (for crispy coating)
- 2 large eggs, beaten
- ¼ cup (55g) vegetable oil (or avocado oil; for searing)
- Salt and freshly ground black pepper, to taste
For the Sweet & Sour Sauce
- ½ cup (100g) granulated sugar
- ¼ cup (60ml) ketchup (use organic or no high-fructose corn syrup if desired)
- ½ cup (120ml) apple cider vinegar (adds bright tang; white vinegar works too)
- 2 tbsp (30ml) soy sauce (low-sodium if preferred)
- 1 tsp garlic powder
- ½ tsp sea salt
For Serving
- Cooked white or brown rice
- Steamed broccoli or stir-fried veggies
- Sliced green onions or sesame seeds (optional garnish)
Step-by-Step Instructions
1. Preheat & Prep
- Preheat oven to 325°F (165°C).
- Line a 13×9-inch baking dish with parchment paper or foil—this prevents sticking and makes cleanup easy.
2. Season & Coat the Chicken
- Pat chicken pieces dry with paper towels—this helps the coating stick.
- Season lightly with salt and pepper.
- Place cornstarch in a large resealable bag. Add chicken in batches and shake until fully coated. Shake off excess.
3. Sear the Chicken
In a large skillet over medium-high heat:
- Heat vegetable oil until shimmering and sizzling.
- Working in batches (don’t overcrowd), dip floured chicken pieces into beaten eggs, then add to hot skillet.
- Sear 2–3 minutes per side, until golden brown and lightly crispy.
- Transfer seared chicken to the prepared baking dish.
4. Make the Sauce
In a medium bowl:
- Whisk together sugar, ketchup, apple cider vinegar, soy sauce, garlic powder, and salt until smooth and well blended.
5. Coat & Bake
- Pour sauce evenly over the chicken in the baking dish.
- Gently toss halfway through baking to coat all pieces.
- Bake uncovered for 1 hour, stirring gently at the 30-minute mark, until:
- Sauce has thickened and glazed the chicken
- Chicken is fully cooked (internal temp 165°F / 74°C)
6. Serve Warm & Sticky
- Spoon warm chicken over steamed rice.
- Garnish with green onions or sesame seeds if desired.
- Serve with steamed or roasted vegetables on the side.
Enjoy the perfect balance of sweet, sour, savory, and tender!
You Must Know
- Use cornstarch, not flour —it creates a crispier, more authentic texture.
- Don’t skip searing —it builds flavor and locks in moisture.
- Apple cider vinegar adds depth —its fruity tang enhances the sweetness.
- Toss halfway —ensures even glazing and prevents drying.
- Sauce thickens as it cools —don’t worry if it looks thin at first.
Storage Tips
- Store leftovers in an airtight container in the fridge for up to 4 days.
- Reheat in oven at 325°F for 10–12 minutes (best texture). Microwave works but may soften coating.
- Freeze for up to 3 months —thaw overnight before reheating.
Ingredient Substitutions
|
Chicken breasts
|
Thighs, tenders, or tofu
|
Juicier or plant-based option
|
|
Cornstarch
|
Arrowroot or potato starch
|
GF-friendly alternatives
|
|
Eggs
|
Egg wash substitute or aquafaba
|
For binding without eggs
|
|
Ketchup
|
Tomato paste + 1 tsp sugar
|
Adjust consistency with water
|
|
Soy sauce
|
Tamari (GF) or coconut aminos (low-sodium)
|
Allergy-friendly swaps
|
Serving Suggestions
- Serve family-style in the baking dish.
- Great for lunchboxes (reheat safely).
- Double the batch and freeze half for future comfort.
- Pair with pineapple chunks for extra tropical flair.
Cultural Context
Born from American-Chinese cuisine, sweet and sour chicken reflects a love of bold flavors and satisfying textures. Found on dinner tables and buffet lines alike, this baked version honors tradition while embracing modern health-conscious cooking—proving that comfort food can be both delicious and doable.
Pro Tips
- Double the recipe? Yes—perfect for freezing or feeding a crowd.
- Want more veggies? Add bell peppers or pineapple to the pan before baking.
- Make ahead: Sear and sauce separately. Combine and bake when ready.
- Label your dish: People will ask for the recipe.
- Say “ready?” before serving —it’s part of the ritual.
Frequently Asked Questions
Q: Can I skip searing and bake it all in one step?
A: Yes—but you’ll miss out on crispiness. For fully baked version, spray coated chicken with oil and bake at 400°F for 25 mins, flip, then add sauce and bake 15 more mins.
Q: Why did my sauce turn out too sweet?
A: Balance with extra vinegar (1 tbsp at a time) next time. Taste before adding!
Q: Is this gluten-free?
A: Only if using GF soy sauce/tamari and verifying cornstarch label.
Q: Can I use frozen chicken?
A: Not recommended—thaw completely first for even cooking and better texture.
Q: Can I air fry the chicken?
A: Absolutely! Spray with oil and air fry at 375°F for 10–12 mins, shaking halfway. Toss with sauce after.
Allergy Information
Contains: eggs, soy, wheat (in most soy sauces).
Gluten-free option: Use tamari and verify all ingredients.
Nut-free: This recipe is naturally nut-free.
Always check labels—especially on soy sauce, oils, and processed ingredients.
Nutrition Facts (Per Serving – Approximate)
Based on 6 servings (with rice)
- Calories: 420
- Fat: 14g
- Saturated Fat: 3g
- Carbohydrates: 48g
- Fiber: 1g
- Sugar: 22g
- Protein: 26g
- Sodium: 680mg
This dish doesn’t shout. It simmers quietly, golden and fragrant, saying everything a great meal should: “Sit down. Eat. You’re taken care of.” That’s how the best ones begin—not with fanfare, but with spice, sauce, and someone who says, “Let’s make it together.”


