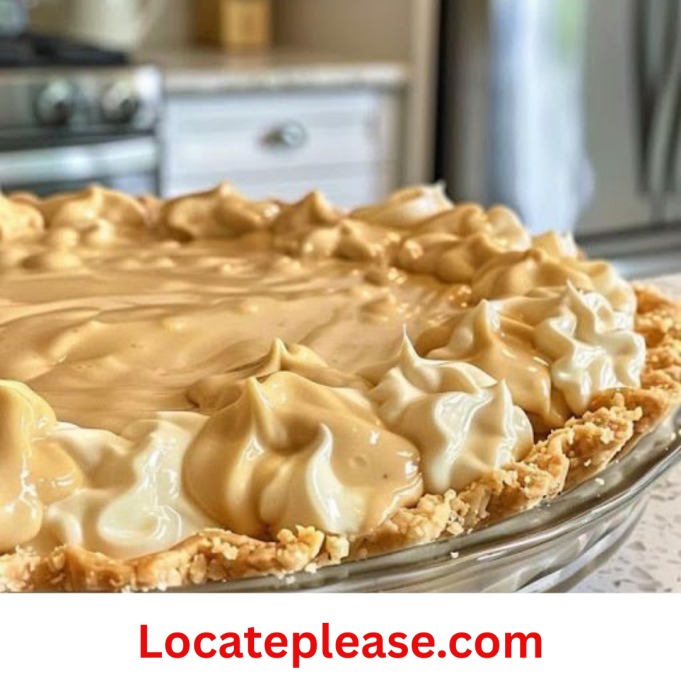
A rich, velvety no-bake pie that blends the deep flavor of chocolate custard with creamy peanut butter in a flaky pre-baked crust. Topped with fresh whipped cream and a sprinkle of elegance, this luscious dessert is a beloved Amish country classic—simple to make, deeply satisfying, and impossible to resist.
Why You’ll Love This Recipe
This isn’t just pie—it’s comfort in a slice. With a smooth, pudding-like filling made from scratch using egg yolks, milk, and flour (not instant pudding mix), it delivers old-fashioned texture and flavor you can’t get from boxed versions. The peanut butter adds a nutty richness, while the subtle chocolate depth makes it feel indulgent without being overly sweet.
Perfect for:
- Holiday desserts
- Potlucks and family gatherings
- Make-ahead treats
- Peanut butter lovers who want something elegant
🥧 “I brought this to Thanksgiving,” said one home cook. “It disappeared before the pumpkin pie even made it to the table!”
Ingredients
For the Filling
- 1 pre-baked 9-inch pie crust (store-bought or homemade)
- ½ cup (60g) all-purpose flour
- 1 cup (200g) granulated sugar
- ½ tsp salt
- ½ cup (120ml) whole milk (full-fat recommended)
- 3 large egg yolks, beaten
- ½ cup (130g) creamy peanut butter (like Jif or Skippy; not natural/oily style)
- 2 tbsp (28g) unsalted butter, softened
- 1 tsp vanilla extract
For the Whipped Cream Topping
- 1 cup (240ml) heavy whipping cream, cold
- 2 tbsp powdered sugar
- Optional garnishes:
- Chopped roasted peanuts
- Chocolate shavings or mini chips
- Drizzle of melted chocolate or peanut butter
Step-by-Step Instructions
1. Combine Dry Ingredients
In a medium saucepan:
- Whisk together flour, sugar, and salt until no lumps remain.
✅ No sifter? Press through a fine mesh strainer for smoothness.
2. Add Milk Gradually
- Slowly pour in milk, whisking constantly as you add it.
- Continue stirring until the mixture is completely smooth—no streaks or clumps.
3. Cook Until Thickened
- Place saucepan over medium heat.
- Cook, stirring constantly with a wooden spoon or silicone spatula, until the mixture comes to a gentle boil (~5–7 minutes).
- Boil 1 minute more, still stirring—thickens into a pudding-like consistency.
✅ Don’t walk away! Scrape the bottom often to prevent scorching.
4. Temper the Egg Yolks
- Remove saucepan from heat.
- Very slowly drizzle about ¼ cup of hot mixture into the beaten egg yolks, whisking vigorously as you pour—this prevents scrambling.
- Once combined, pour the yolk mixture back into the saucepan.
5. Simmer & Smooth
- Return saucepan to low heat.
- Cook 2 more minutes, stirring continuously, until thick and glossy.
- Remove from heat immediately.
6. Add Peanut Butter & Flavor
- Stir in peanut butter, butter, and vanilla extract until fully melted and blended.
- The residual heat will melt everything into a silky, homogenous filling.
✅ Tip: Use room-temp peanut butter for easier blending.
7. Cool Before Pouring
- Let the filling cool to room temperature, stirring occasionally to prevent a skin from forming.
❗ Do not skip cooling —adding warm filling to a baked crust can cause sogginess.
8. Assemble the Pie
- Gently pour the cooled filling into the pre-baked pie crust.
- Smooth the top with an offset spatula for a clean finish.
9. Chill Until Set
- Refrigerate at least 3 hours, preferably 4–6 hours, until firm and chilled through.
- Cover loosely with plastic wrap if chilling longer than 4 hours.
10. Top with Fresh Whipped Cream
Just before serving:
- In a chilled bowl, beat cold heavy cream and powdered sugar with a hand mixer or whisk until soft peaks form.
- Spread or pipe over the chilled pie.
- Garnish with chopped peanuts, chocolate shavings, or a drizzle of melted chocolate.
You Must Know
- Use real peanut butter —natural kinds with oil separation may make the filling greasy.
- Cool filling completely —warm fillings weep and soften the crust.
- Chill thoroughly —under-chilled pies won’t slice cleanly.
- Whip cream last —it deflates over time; best made fresh.
- Store covered —prevents odor absorption and drying out.
Storage Tips
- Store in the refrigerator, loosely covered, for up to 4 days.
- Not recommended for freezing —texture changes upon thawing.
- Add whipped cream only when ready to serve.
Ingredient Substitutions
|
Peanut butter
|
Almond butter or sunflower seed butter
|
For allergy-friendly option
|
|
Whole milk
|
Half-and-half or oat milk
|
Richer or dairy-free alternative
|
|
Egg yolks
|
½ cup condensed milk (reduce sugar)
|
For shortcut method
|
|
Pre-baked crust
|
Graham cracker or Oreo crust
|
For different base flavor
|
|
Whipped cream
|
Coconut whipped cream
|
Dairy-free topping
|
Serving Suggestions
- Serve with coffee, tea, or cold milk.
- Great for brunch, holidays, or after-dinner treats.
- Double the batch for parties or gift one to a neighbor.
Cultural Context
Rooted in Amish and Mennonite communities of Pennsylvania and Ohio, this pie reflects a tradition of making rich desserts from simple ingredients. Born in kitchens where baking was daily work and frugality was honored, recipes like this used pantry staples to create something special. Found at church auctions, family reunions, and Sunday dinners, it’s proof that good food doesn’t have to be fancy—just heartfelt.
Pro Tips
- Double the recipe? Yes—use two crusts or make mini pies in ramekins.
- Make ahead: Prepare filling 1–2 days ahead. Store in fridge, then bring to room temp before pouring.
- Want more chocolate? Add 2 tbsp cocoa powder to dry ingredients or drizzle on top.
- Label your dish: People will ask for the recipe.
- Say “ready?” before slicing —it’s part of the ritual.
Frequently Asked Questions
Q: Can I use a graham cracker crust?
A: Absolutely! It pairs beautifully with peanut butter—swap freely.
Q: Why did my filling turn out runny?
A: Likely undercooked or too much liquid. Cook until thick and don’t rush the boiling step.
Q: Is this gluten-free?
A: Only if using GF flour and crust. Always verify labels.
Q: Can I make it without eggs?
A: Not easily—the custard relies on yolks for structure. Try a pudding-based version instead.
Q: Can I add chocolate chips?
A: Yes! Fold in ½ cup mini chocolate chips before chilling.
Allergy Information
Contains: eggs, dairy (milk, butter, cream), wheat (in crust and flour), tree nuts (if using nut butter).
Gluten-free option: Use certified GF flour and crust.
Nut-free option: Use sunflower seed butter and verify all ingredients.
Always check labels—especially on pre-made crusts and peanut butter.
Nutrition Facts (Per Slice – Approximate)
Based on 8 servings
- Calories: 420
- Fat: 28g
- Saturated Fat: 11g
- Carbohydrates: 38g
- Fiber: 2g
- Sugar: 22g
- Protein: 8g
- Sodium: 380mg
Note: Nutrition values are estimates and may vary based on brands and substitutions. Not intended as medical advice.
Final Thought: This pie doesn’t shout. It sits quietly in the fridge, cool and golden, waiting to surprise you. One bite—creamy, nutty, perfectly sweet—and you’re reminded: sometimes the best things don’t need chocolate on top. They just need love, patience, and someone who says, “Let’s make it special.”


